- Sample:
- 15180ee9f6a8682b24a0d5cb0491bb4e09d457bfab5a24ec1fcb077dab59773b (Bazaar, VT)
- Infection chain:
- .NET dropper -> .NET dropper + Reflective DLL -> Loki
- Difficulty:
- Easy
Introduction
Today we will try to unpack a simple 2-layers .NET dropper using static analysis only. The goal of most malware packer/obfuscator is not to be hard to crack: it is to circumvent AV detection for a while, and eventually get replaced by a new one afterwards. And at the very end of the packer food chain are packers written in VB, .NET and AutoIT: they are particularly cheap and easy to crack. The sample we are about to analyse is no exception and will make a good introduction to Malcat's decryption algorithms.
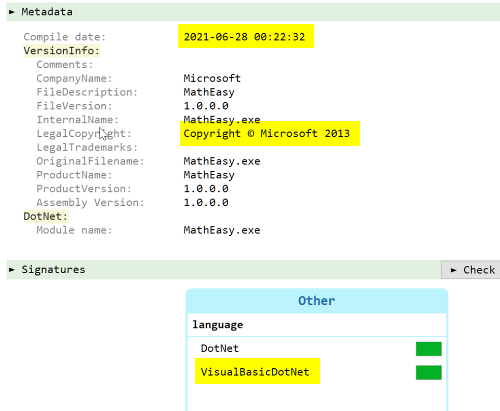
A quick glance at the file metadata tells us immediately that the file is suspicious. A VB.NET application from Microsoft with a 2013 copyright but freshly compiled... sure, those version informations are 100% not fake.
Let us cut the overview right there as we will directly focus on the packed payload.
Locating the payload
Most .NET packers embed one or more encrypted assemblies. .NET assemblies are not small, they have to be put somewhere. They are usually put inside .NET resources (sometimes insides pictures), .NET static arrays or strings. For this sample, Malcat has already spotted a 800KB+ hexadecimal string inside the program (HugeStringHexa), which is kind of unusual.
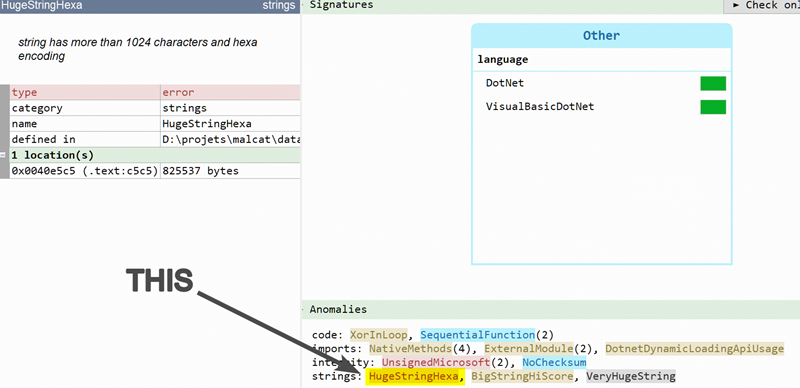
This is confirmed in the Strings view (shortcut: F6), which tells us than more than 90% of the file is made of strings, and that our big hexadecimal string is by far the biggest one (the size 412768 is given in characters, so actual size for UTF16 is twice as much, about 824KB). Moreover, it has exactly one code reference, which is always a good indicator for packed data:

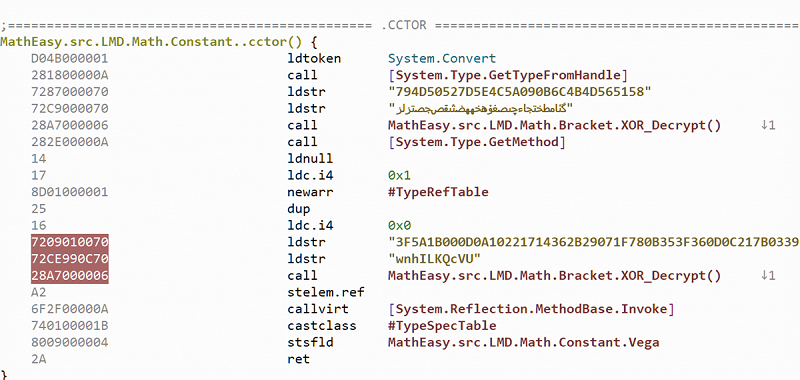
If we follow the string reference in the Code view (right-click on the string, and then choose Cross-references sub-menu) we land on the code snippet presented below. By looking at the names of the method and package there, we can infer that the application we are analyzing was most likely a clean .NET software that has been only slightly modified to include a couple of malicious methods. This is a technique commonly used by obfuscators to evade AV heuristics.
The content of the method also tells us that we won't have to start our VM for now. In fact, the hexadecimal string seems to be decrypted using a simple XOR algorithm using the key "wnhILKQcVU":
Decrypting the first layer
Malcat comes with several decryption algorithms which we will use on the string. First, right-click on the big hexa string and chose the Transform... sub-menu. We will apply the following transformations (in order):
- change text encoding from UTF-16le to UTF-8: we get an ascii hexadecimal string
- hex decode the hexadecimal string: we get the raw bytes
- decrypt using the XOR algorithm and the key
"wnhILKQcVU"
After these three pass, we obtain ... a base64 string, so the job is still not finished. Using Malcat's transformations, we can easily decode the base64 string. The result is identified by Malcat as a ... GZIP archive. Sure, after encoding your payload in hexa and base64, now you start to care about storage efficiency. But ok, Malcat can handle GZIP archives just fine. Just double-click the content stream inside the files tab to finally obtain ... a new PE file!
At this point we can discard the rest of the application: the payload we just decrypted made for more than 90% of the file and the packer authors cared enough to pack it several time. So it's pretty safe to assume that we got everything there was to see there.
Decrypting the second layer
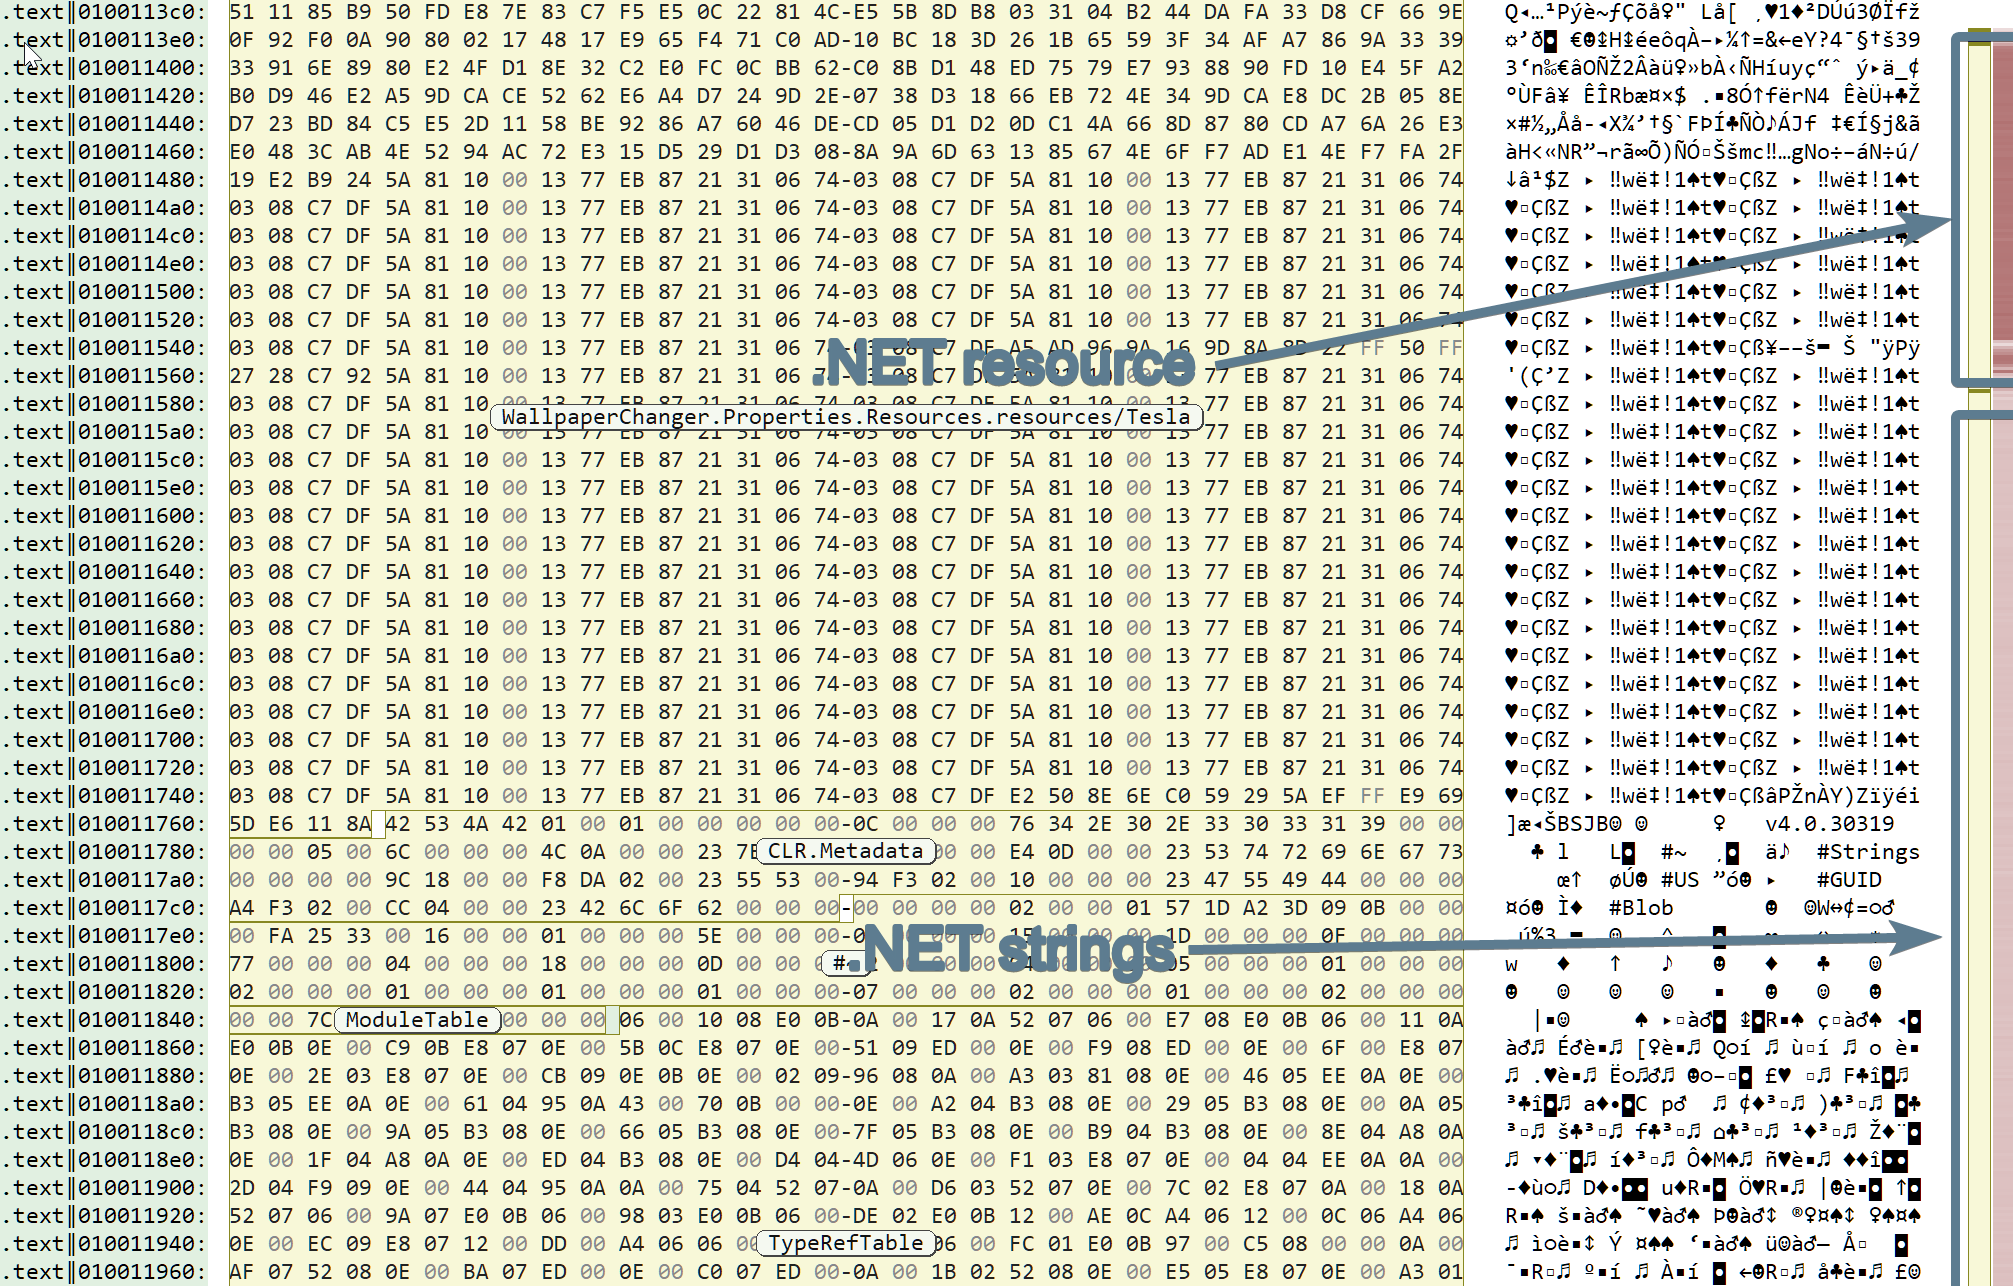
The second layer is also a .NET executable which also contains stolen VersionInformations (claims to be WallpaperChanger.dll). This time, there seem to be more than one packed content:
- we see a high-entropy .net resource named
Teslaof about 60Kb - one big base64 string of about 185Kb at offset
0x100131da - two small hexadecimal strings of ~100 bytes
The rest of the application seem to be a clean app, with a few added malicious methods inside the class WallpaperChanger.QsJAksvOJQZGMrkQGUrJCZfDxJspOiApOTEDEDQQQBBEDh. So we will save us some time and not analyze the code, and instead focus on the packed data: the big resource and the big base64 string. Let us start with the resource.
When adding a resource to a .NET program under VisualStudio, a standard resource getter name get_<resource_name> is often created. So we will go into the symbols list (shortcut: F5), hit Ctrl+F and look for Tesla. There is exactly one method named WallpaperChanger.Properties.Resources.get_Tesla at offset 0x1000278c. The getter has only one code reference at address 0x100026dc which looks promising:
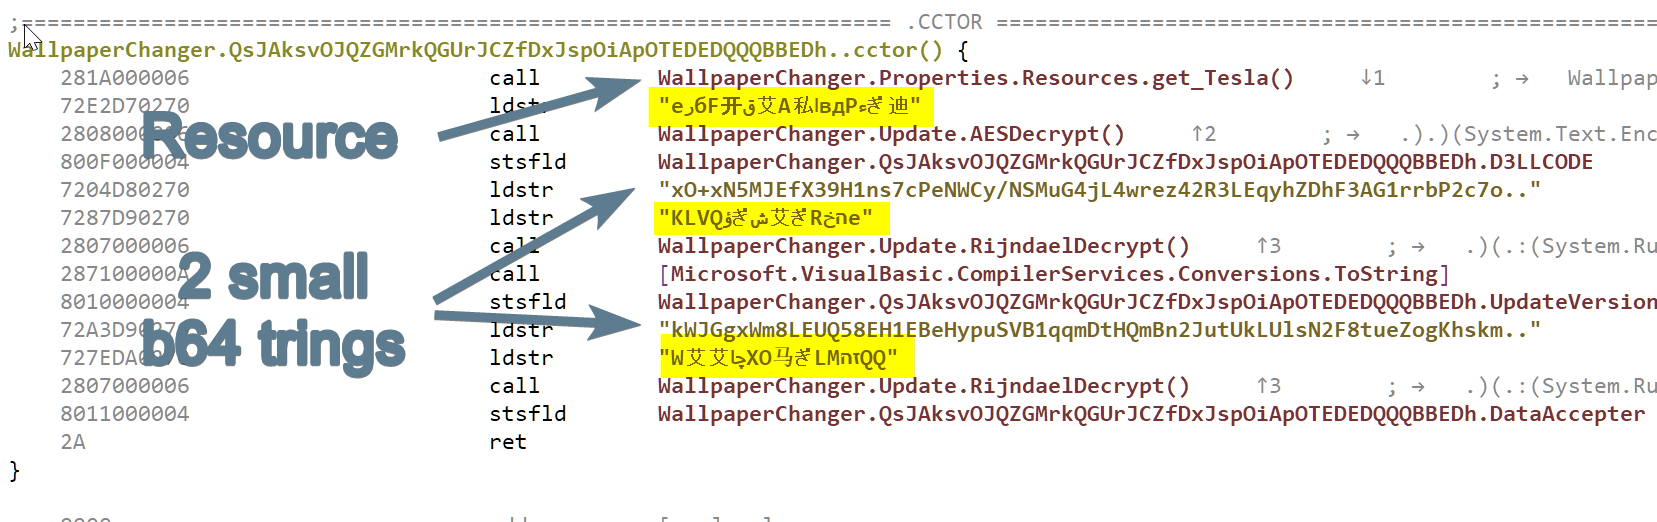
We see two different decryption methods called there:
- the method
AESDecryptused to decrypt the .NET resourceTesla - the method
RijndaelDecryptused to decrypt the two small base64 strings we spotted earlier.
The big base64 string does not seem to be decrypted there. Since the small strings seem to be of little interest, let us focus on the method AESDecrypt first.
Decrypting the Tesla resource
It looks like the authors of the packer were not satisfied with the security offered by XOR encryption and chose to step up their game:
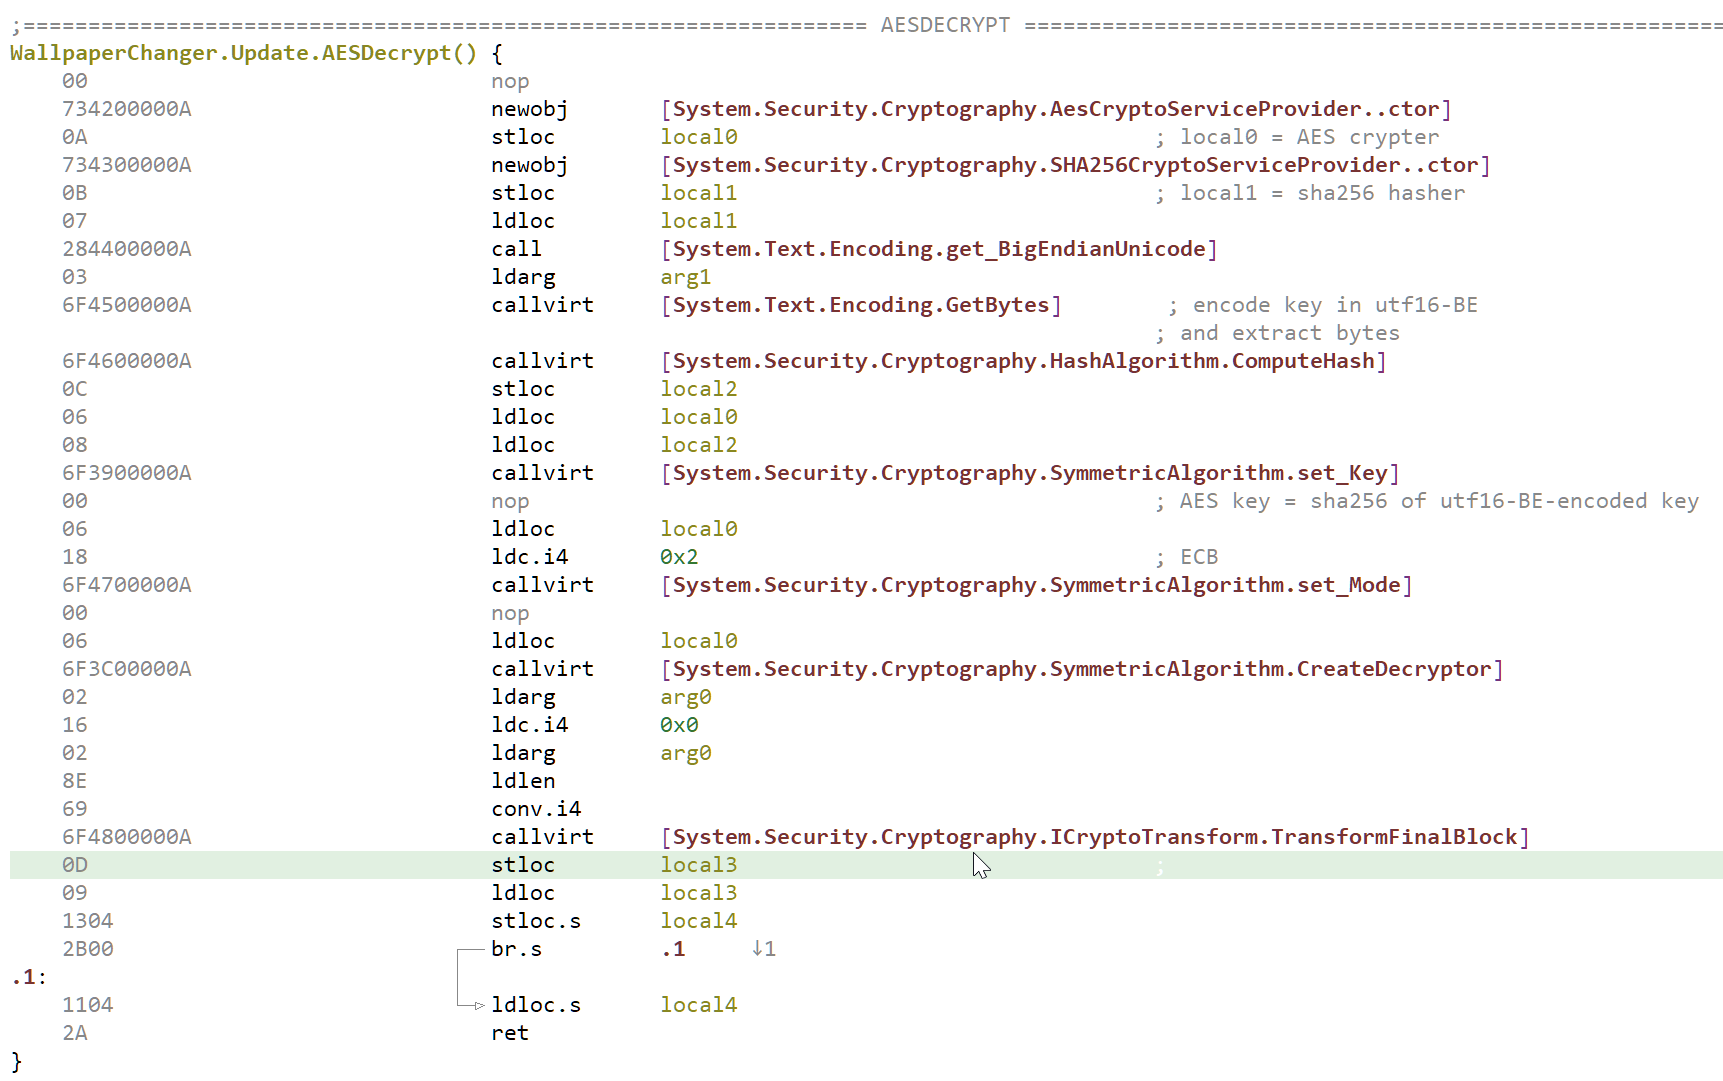
The code is pretty straightforward: the string "eرбF开ق艾A私اвдPءぎ迪" is first encoded in utf16-BE and then hashed using the SHA256 algorithm. The result will be used as KEY for the AES algorithm. No IV is defined, since the encryption mode is set to ECB. At the end, the resource content is decrypted using AES. We could easily recover the decrypted content using a debugger there, but since the code is pretty straightforward, we can also do everything statically inside Malcat. First, we need to compute the AES key. We can simulate what the code is doing using the following script:
1 2 3 4 | |
Hit F8 to enter the script editor, remove the example script, paste this content and you will see the result in the output window. Copy the key in the clipboard and you are ready to decrypt the resource using Malcat's AES transform:
What we get is a reflexive PE injector .NET DLL rightly named RunPE.dll. This is the kind of utility assembly which is used by dropper to inject their payload into a running process. Interesting, but it's definitely not our payload.
Decrypting the base64 string
Our next payload candidate is the big 185kb base64-encoded string located at address 0x100131da. There is again only on code location referencing this string at address 0x1000208c. We can see that the string is decrypted using the method RijndaelDecrypt this time using the key "wnhILKQcVU". This is the same key which was used in the first layer for the XOR encryption.

This time the block cipher is used in CBC mode (the default in .NET) and the key generation is based on the Rfc2898 (aka PBKDF2) algorithm. If we have a look at the offical documentation, we can see that the constructor of the class Rfc2898DeriveBytes takes two inputs:
- a key, which in our case would be the string
"wnhILKQcVU"(encoded in UTF-8 by default, since no encoding is specified) - a salt, which looks like a 8 bytes array initialized with the value of the field
DD5783BCF1E9002BC00AD5B83A95ED6E4EBB4AD5
The class Rfc2898DeriveBytes is then used to generate a given number of bytes (32 and then 16 in this case) which are used as key and IV for the cipher.
Regarding the Rijndael algorithm, we can see that in the .NET core implementation, it defaults to AES256. This is good news for us, this means that the only thing we have to figure out is how to generate the key and IV. Again, we could debug the sample, but where is the fun in that? We will rewrite it in python instead.
First thing first, we have to retrieve the salt value (an 8 bytes array) which is located in the field DD5783BCF1E9002BC00AD5B83A95ED6E4EBB4AD5. By clicking on the field in the Code view, we can see its definition in the FieldTable structure. This field has three important flags set: HasRVA, Static and InitOnly which indicates that this is a static initialized variable. Also the HasRVA flag tells us that the field has an entry inside the .NET FieldRVA table.

The FieldRVA table has only one entry for field number 0x15 (aka 21) which is our field (the field DD5783BCF1E9002BC00AD5B83A95ED6E4EBB4AD5 is at index 20 aka 0x14 in the FieldTable, but Field references start at 1 because 0 is reserved).
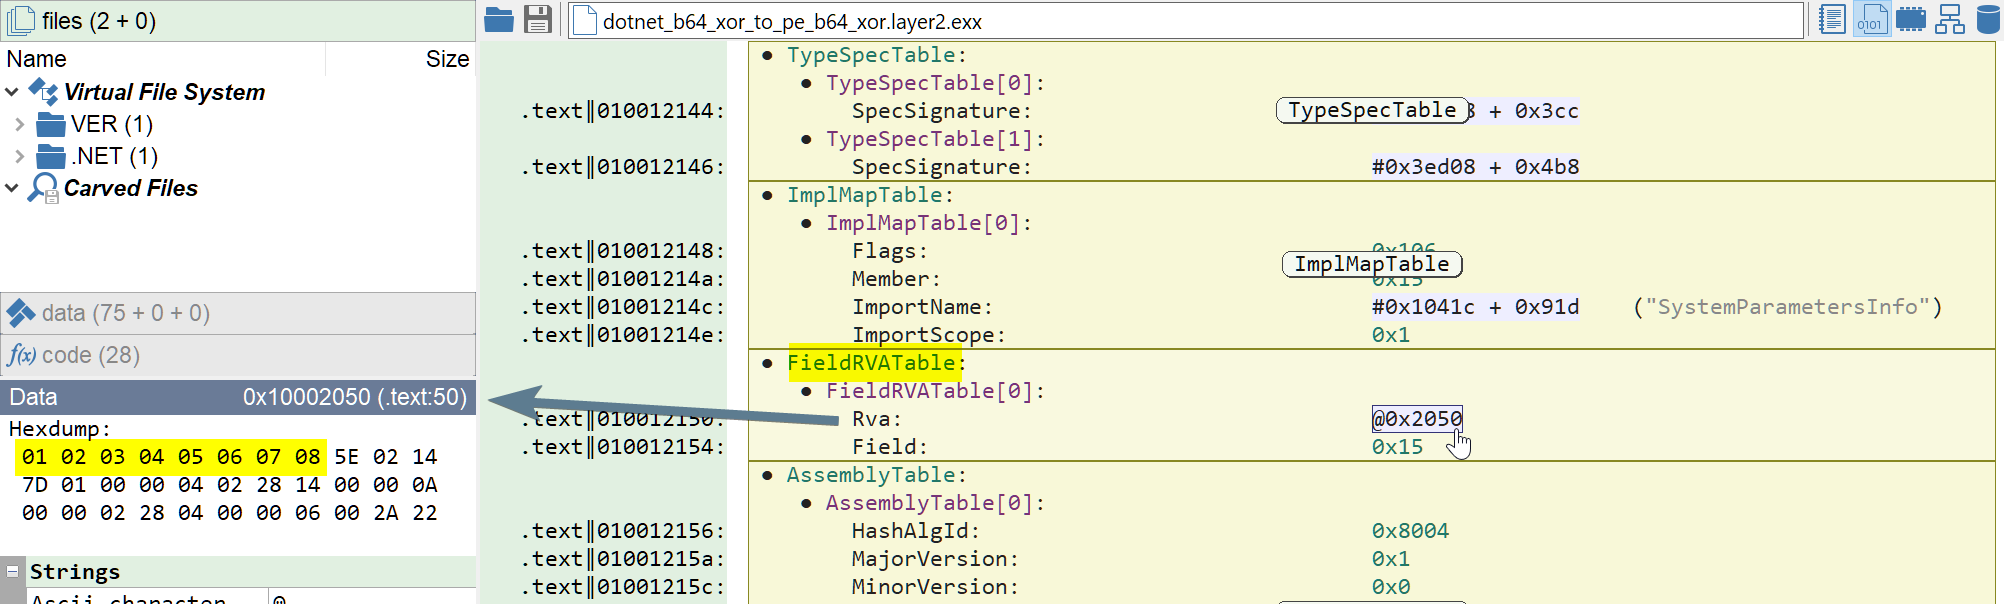
The format of the data stored depends on the field type (and whether or not a ClassLayout exists). But we are dealing with a very simple 8 bytes array here, so reading the initial value is very simple: it is { 1, 2, 3, 4, 5, 6, 7, 8 }, our salt.
Next, we need to emulate the behavior of the class Rfc2898DeriveBytes. We will use the Cryptodome python package which comes bundled with Malcat and its PBKDF2 algorithm. Go into the script editor (shortcut: F8) and paste the following code:
1 2 3 4 5 6 7 8 | |
Now that we know both the key and the IV, we can decrypt the string at offset 0x100131da using the usual steps:
- Right-click on the string from the code view or the strings view and chose Transform..
- Change encoding from utf16 to utf8
- Base64 decode the result
- AES decrypt the result in CBC mode using the key and IV found above
- Base64 decode the result ...
- Extract the GZipped content ......
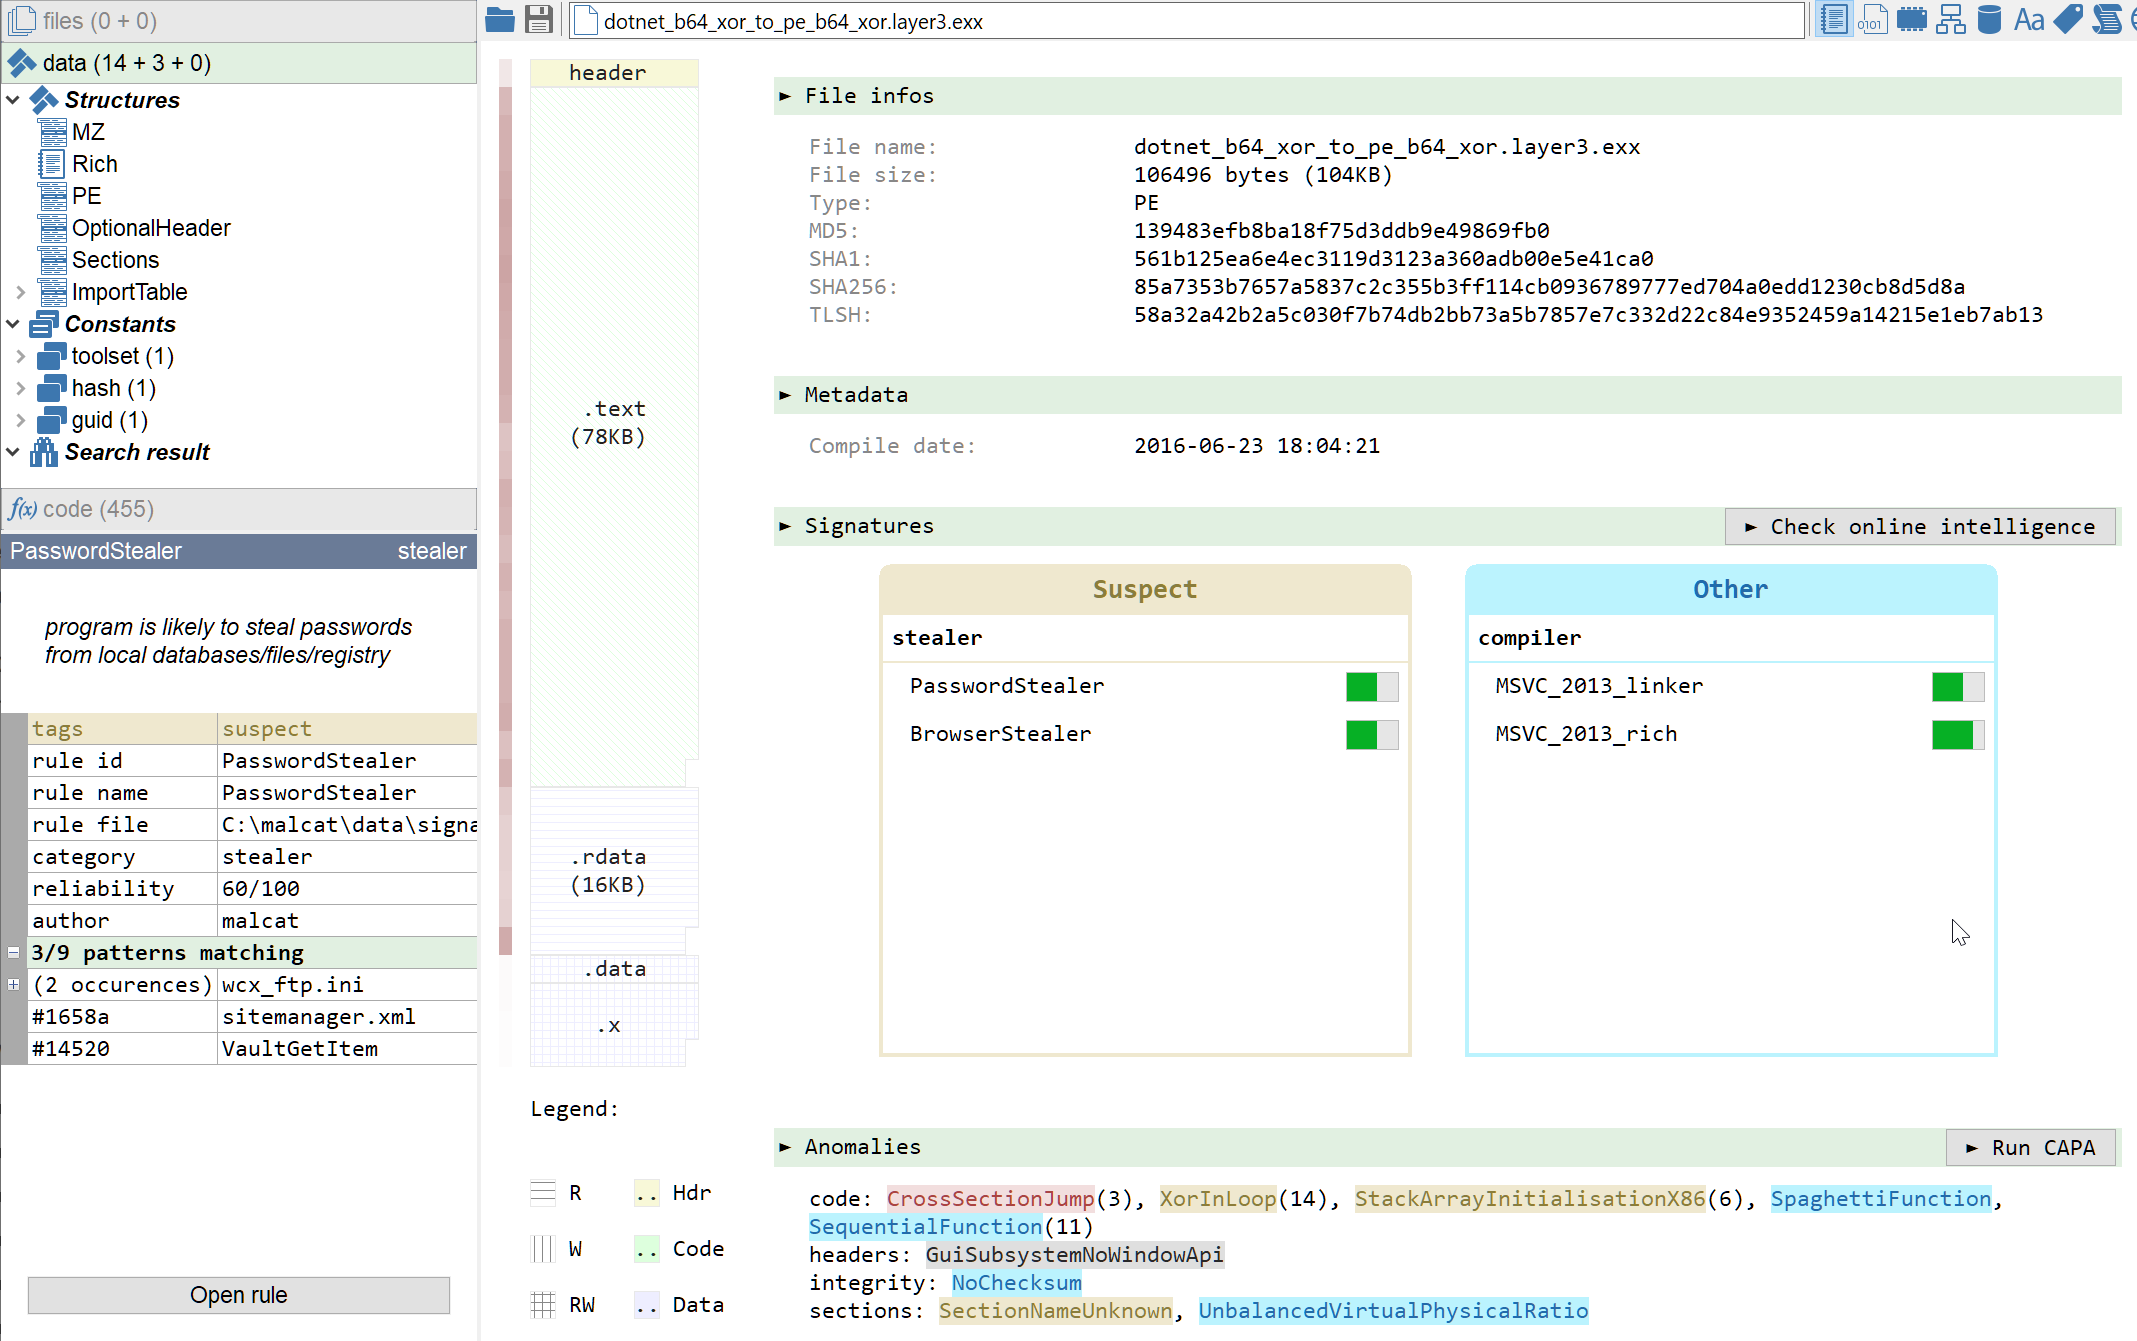
- We get a new PE file!
The PE file looks like a native infostealer and is detected as Loki on VirusTotal. While a lot of its content is in plain text, some strings and configurations are still encrypted. The decryption process may be the subject of another blog post.
Conclusion
We have seen how to navigate inside a .NET program, look for possible payload locations and how to use the different decryption algorithms inside Malcat to extract the stages of the malware. We also introduced the python script engine of Malcat, even if we just scratched the surface there (a scripting example which makes use of the bindings will be the subject of a future blog post).
Statically unpacking a sample, while more complicated than debugging, offer many advantages:
- we get better quality dumps
- we don't care about anti-debugging and anti-sandboxing tricks
- the scripts which were developed can be reused on other samples in the future
- it forces us to better understand the packing logic, and makes us less likely to miss something
I hope you enjoyed this first tutorial, feel free to share with us your remarks or suggestions!