- Sample:
- e850f3849ea82980cf23844ad3caadf73856b2d5b0c4179847d82ce4016e80ee (Bazaar, VT)
- Infection chain:
- Excel stylesheet -> Office equation -> Shellcode (downloader) -> NSIS installer -> Shellcode (stage 1) -> Shellcode (stage 2) -> Lokibot
- Tools used:
- Malcat, Speakeasy emulator
- Difficulty:
- Easy
The Excel document
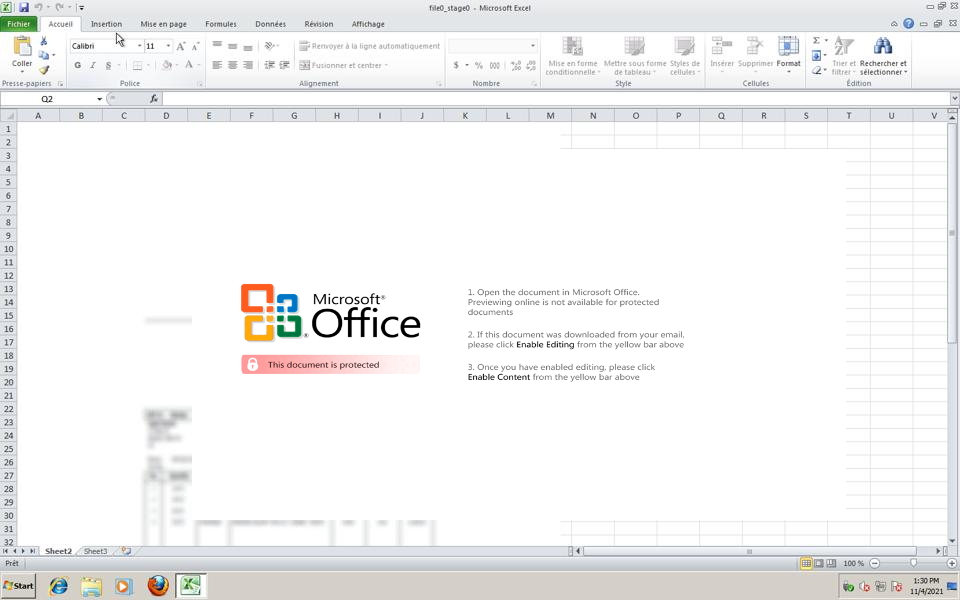
The sample we are about to dissect today is an OpenXML Excel document which came as email attachment. The malicious document is very similar to the one we did analyze in our previous blog post: an encrypted OpenXML Excel document embedding an Equation object exploiting CVE-2018-0798. The same author is most likely behind this document as well, they just updated the bait picture:
We won't go through the exploit shellcode extraction and decryption process again since the procedure is exactly the same (see here, shellcode offset is also 0x50). The exploit is again a downloader, downloading from the following url:
hxxp://103.153.79.104/windows10/csrss.exe
At the time of the analysis, the file is still online. But this time, we don't get a DBatLoader instance, but a NSIS installer instead. So let us fetch the file and have a look at the installer.
NSIS installer
The file csrss.exe is a 418KB PE file of sha256 291df8186e62df74b8fcf2c361c6913b9b73e3e864dde58eb63d5c3159a4c32d (Bazaar, VT). A NSIS installer is nothing more than a NSIS archive appended to the NSIS PE installer. The file format of the archive, while not very documented, is relatively simple as we will see.
NSIS archive
A NSIS archive is composed of a small NSIS header followed by the archive content. The header does not contain a lot of information:
FirstHeader:
    Flags:                                                      // some installation flags
    Signature:                                  0xdeadbeef      // NSIS archive start magic
    Magic:                                      "NullsoftInst"  // also magic
    InstallerSize:                              0x6244          // unpacked size of the setup script
    ArchiveSize:                                0x5e12e         // size of the archive
Like you can see, it does not tell us a lot. Directly following the headers come the "files". I say "files" because they don't really have names, it is more like a list of data bytes or buffers. The files are compressed, and can be stored using two modes:
- the solid mode: archive content is a single compressed stream. The unpacked stream is a sequence of N buffers, where each buffer is prefixed by a DWORD telling the size of the buffer.
- the non-solid mode: archive content is a sequence of N compressed streams, one for each file. Each compressed stream is prefixed by a DWORD telling the size of the stream.
There is sadly no flag in the header telling us which mode is used, this information is hardcoded inside the NSIS installer executable. The only solution there is trial and error: if the start of the archive starts with a DWORD which could be a size, then it's most likely the non-solid mode. If it looks like a compression header, then it's most likely the solid mode. And regarding compression, NSIS supports three compression algorithms:
- LZMA (without headers)
- Zlib
- A custom bzip2 compression algorithm
Malcat supports NSIS files using both solid and non-solid mode for the Zlib and LZMA compression methods, but lacks support for bzip2, since the compression algorithm is custom. But since it's also the least used one, it's not really a big deal. The NSIS archive we are looking at is a solid LZMA archive, so unpacking it is no issue. Like for most archive formats, Malcat lists found files in the upper left corner of the screen, under the Virtual File System tree. Double-clicking on a file opens it inside Malcat.
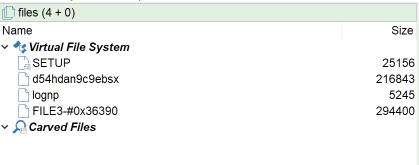
The first file is always the installer setup script, followed by user-provided files and/or installer plugins. As you can see, Malcat did give name to some of the files (all but the last one) which somehow contradicts what I said before. But these names have been recovered by reversing the SETUP script, and there is no guarantee that it is the real name for these files. Even worse, a buffer in the archive can be extracted under different names on the local filesystem, so don't trust these names 100%.
The SETUP script
The first thing to look at when reversing a NSIS installer is the setup script. NSIS scripts are a bunch of sections and assembly code written for the NSIS virtual machine. The NSIS VM architecture is relatively simple:
- Every instruction is encoded on 7 DWORDs: first DWORD is for the opcode (about 70 different opcodes) and the other 6 DWORD encode arguments
- Depending on the opcode, arguments can be either:
- a register (up to 31 registers):
$0..$9,$R0..$R9or one of 11 specific registers like$EXEPATHor$CMDLINE(some are read-only, so more like constants) - a global variable:
$var0..$varN - an integer, signed or unsigned. It can also be an offset into the code section for jump-like opcodes
- a string, more precisely an index into the
Stringssection of the setup script
- a register (up to 31 registers):
- Strings themselves can be somewhat complex to parse/interpret:
- there are 3 NSIS versions: ansi, park (a mix between ansi and unicode) and unicode. Each version encodes strings differently. There is sadly no flag telling you which version is used.
- strings can contains any of 4 special opcodes:
skip,shell,varorlang - strings can include reference to system paths, variables or other strings, e.g.
"open {$INSTDIR}\rampage\goodie\noticeably.tif"
Luckily for us, the full edition of Malcat features a NSIS disassembler / decompiler, so let us jump directly to the entry point of the script (Ctrl+E) and have a look at the OnInit method:

We can see that the script does the following:
- extract the first buffer (offset
header+0in archive) to a file namedd54hdan9c9ebsx - extract the second buffer (offset
header+0x34f0fin archive) to a file namedlognp - extract the third buffer (offset
header+0x36390in archive) to${PLUGINDIR}\dwksh.dll, wherever that could be - call dwksh.dll's exported method
sdvffrypwithout any argument
The rest of the method seems like junk code, judging by the strings which are either random letters or picked out of dictionary. Quickly inspecting the first two files tells us that both are encrypted and/or compressed, so no quick-win there. We have to dig into the dll.
Stage 1: dwksh.dll
dwksh.dll is a 294KB 32-bits DLL of sha256 be00a655cdf4e4706bf1bbf3659d698f967cad66acdf7cda0d12f16dc0cfda3e (VT). It contains several obfuscated methods. But we reversed the setup script and know what to look for: the method sdvffryp. This methods starts by reading a local file named lognp:
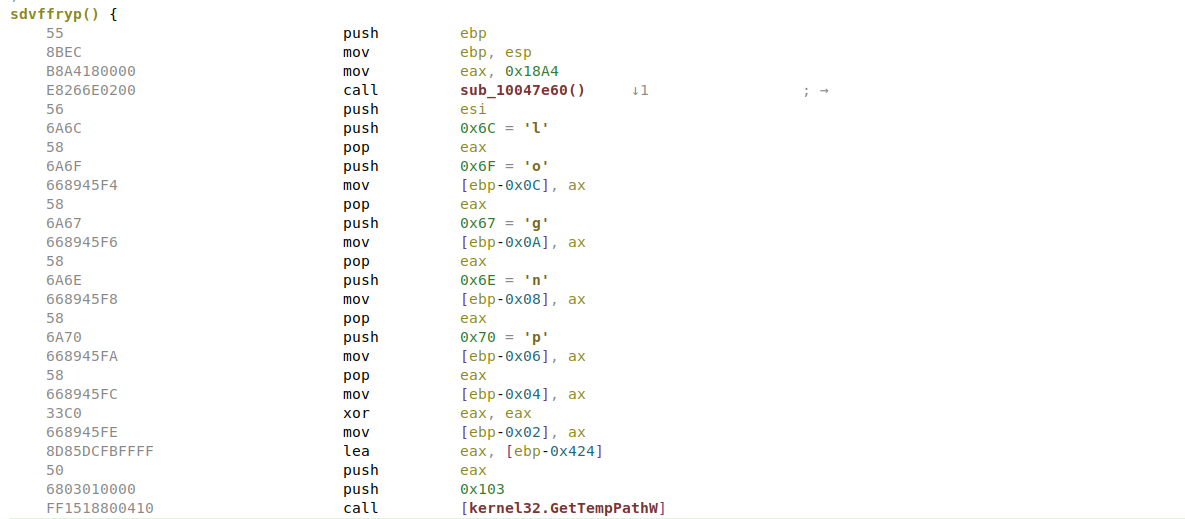
It then seems to decrypt it in memory into an executable buffer before jumping at the beginning of the buffer (see the call eax below?). The file lognp is relatively small (5KB), it definitely looks like a shellcode.
The decryption is pretty straightforward according to the sleigh decompiler. Every byte seem to be decrypted using the following formula:
byte[i] = ((((byte[i] - 3) ^ 0xf2) + 0x11) ^ 0x28) - 1
Decrypting the lognp file should be a piece of cake. Just open the file inside Malcat, select every byte (Ctrl+A) and open the transform dialog (Ctrl+T). There you can chose the custom arithmetic transform which allows you to transform sequence of bytes/words/dwords using a custom python expression. Just paste the equation above, replacing byte[i] by value and voila, you've just decrypted the second stage.
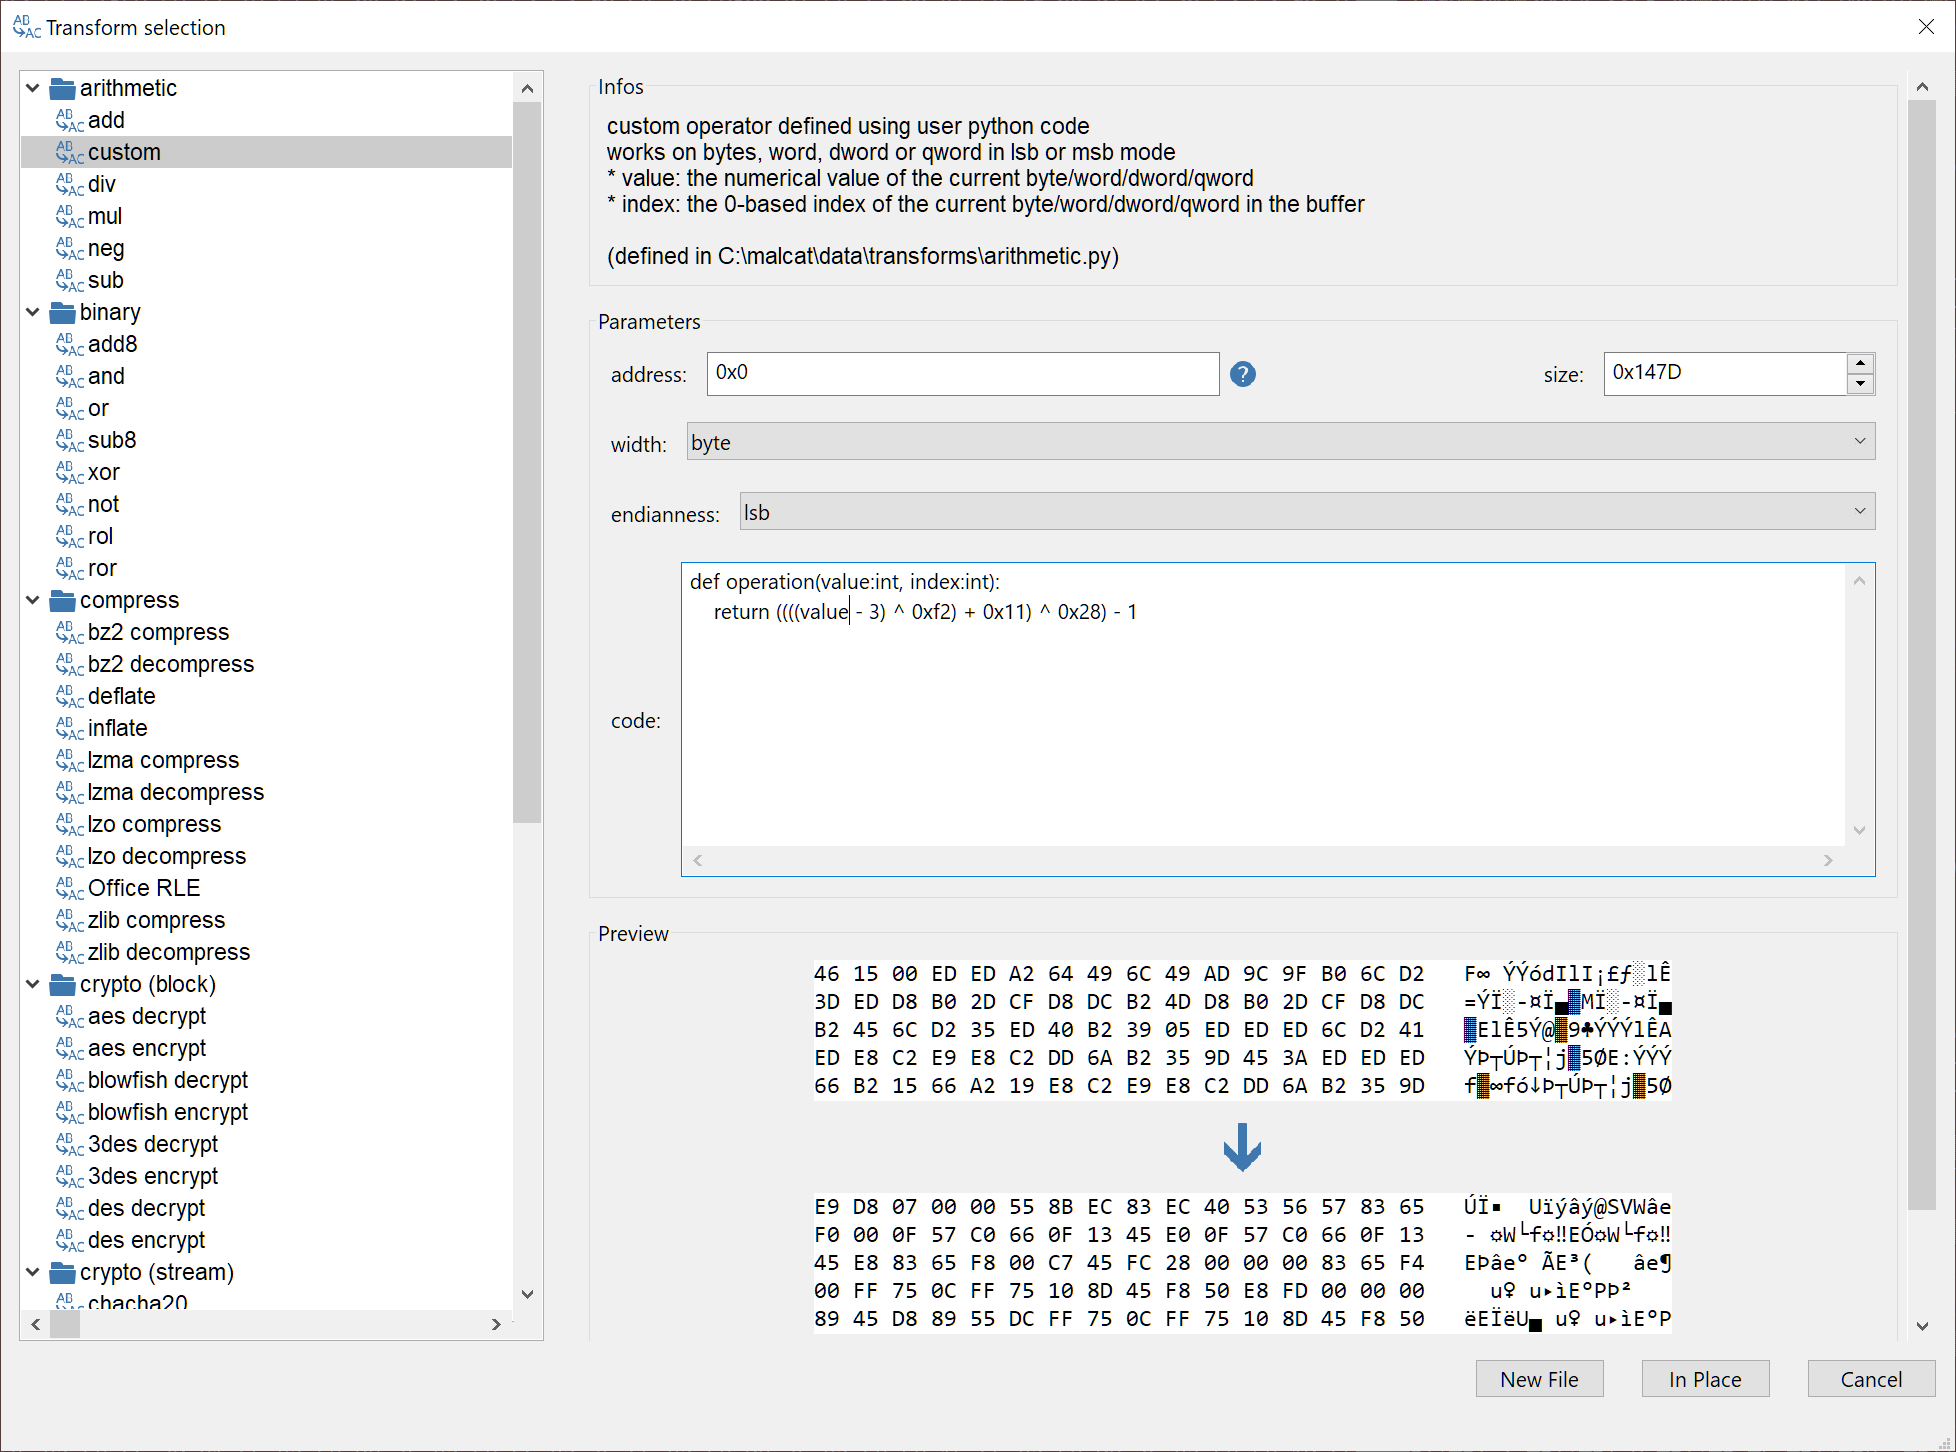
For the lazy readers, you can download the decrypted lognp file here (password: infected).
Stage2: obfuscated shellcode
Analyzing the shellcode
The lognp file, once decrypted, does not appear to be in any known file format. But the first byte is E9, which is a jump in the x86 architecture and is very typical for shellcode prologs. So before starting the analysis, we will have to tell Malcat two things:
- the architecture used: x86 in our case. This can be set using the dropdown menu in the status bar
- the entry point of the shellcode, which is at address 0 in our case. We just have to define a new function start at this address using the context menu in disassembly mode (F3)
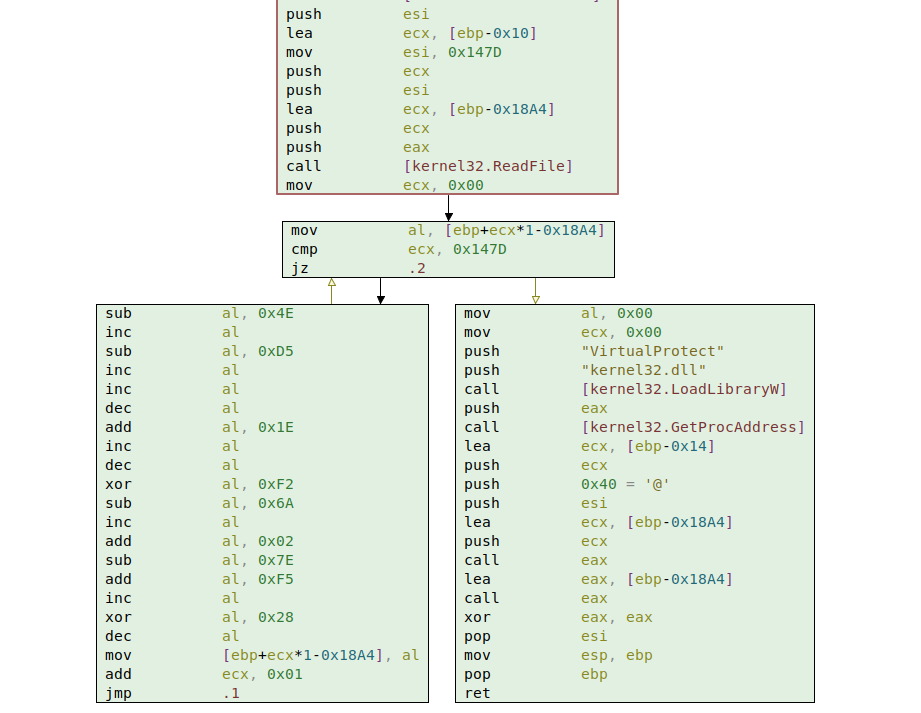
After this, Malcat is smart enough to recover most of the shellcode's CFG using its usual set of analyses. Following the control flow, we quickly arrive in the function sub_7dd which contains interesting patterns:
- the string
d54hdan9c9ebsx(one of the NSIS archive's file names) is pushed on the stack at address0x8eb - something like a
CreateFileAAPI call is performed at address0x989(the constant0x80000000is most likely forGENERIC_READ). If we wanted to be sure, we would have to emulate the API lookup function at address0x776, but it looks like safe assumption. - soon after, the function
sub_a01gets called. Decompiling this functions reveals something similar to a decryption loop
The whole process can be retraced in the animated GIF below:
The code of the decryption function is given below. It is obviously obfuscated, and sadly it would not be immediate to reimplement it in python in Malcat. So we will have to find an alternative. Since the decryption function prototype is very simple (it just needs a pointer to the buffer and the buffer size) and is without side effects, why not give emulation a go?
1 2 3 4 5 6 7 8 9 10 11 12 13 14 15 16 17 18 19 20 21 22 23 24 25 26 27 28 29 | |
Emulating the decryption function
To emulate shellcodes, Malcat comes bundled with a script named speakeay_shellcode.py which emulates shellcodes using the Speakeasy emulator. Note that Speakeasy is not bundled with Malcat, you will have to install the python package yourself (and if you are running Malcat under Windows, be sure to check Use system python interpreter in the options).
Patching lognp
Before emulating anything, we need to solve a problem: the data to decrypt (d54hdan9c9ebsx) is not embedded in the lognp shellcode, it is read from the filesystem using CreateFileA. So emulation is likely to fail. How are we going to solve this issue?
There is the clean way: we could hook the CreateFileA/ReadFile APIs in speakeasy and intercept the call to give back the content of the file d54hdan9c9ebsx.
But there is also the dirty way: we could patch the decrypted lognp shellcode in order to embed the content of d54hdan9c9ebsx in the shellcode space and patch the shellcode entry point to perform a call to the decryption function with the right parameters. Of course we will chose the dirty way. It is not only way faster, it is also more fun.
Here is how to proceed:
- First open a copy of the decrypted
lognpshellcode in Malcat with extra space at the end of the file (File > Open Copy of File). The filed54hdan9c9ebsxis 216843 bytes big, we'll append 300KB just to be sure. - Copy the content of the file
d54hdan9c9ebsxin the clipboard: in a second Malcat instance, opend54hdan9c9ebsxand then hit Ctrl+A followed by Ctrl+C - Paste the copied data after the shellcode in the first Malcat instance, let's say at address
0x2000to make it easy to remember - Enter disassembly view (F3) and go to the shellcode's entry point at address 0
Malcat does not (yet) support assembling your own instruction, so we will need to manually edit the machine code. Click on any hexa byte in disasm mode and enter edit mode (Insert key). We need to assemble the following code:
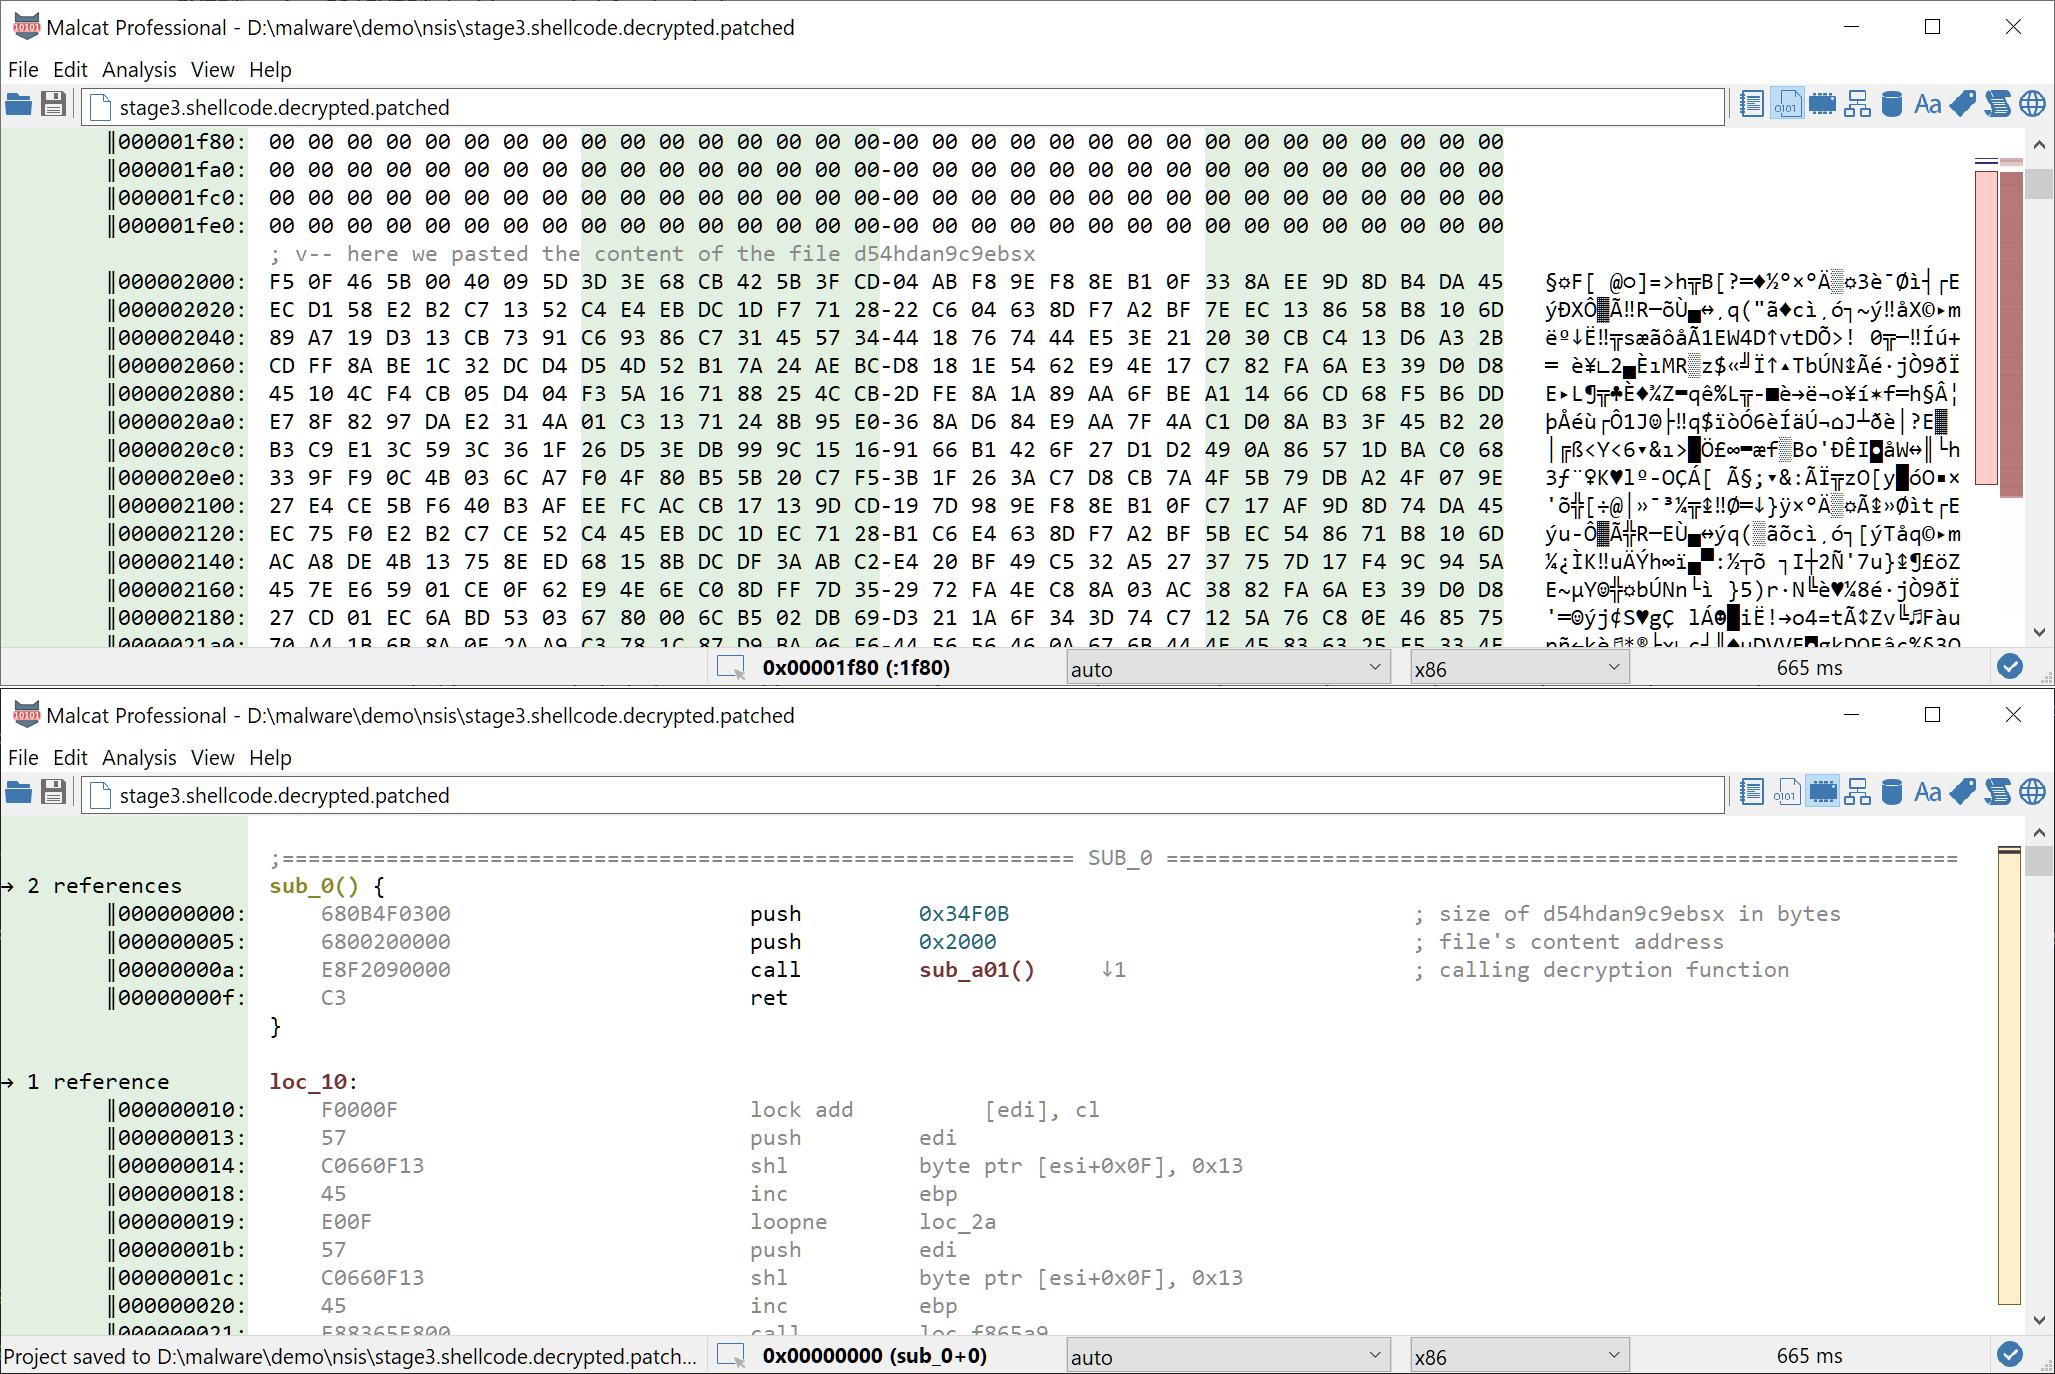
- Push the second parameter which is the size of the buffer to decrypt (216843 = 0x34F0B).
push uint32is assembled using0x68+LSB-encoded uint32in x86:68 0B 4F 03 00 - Push the first parameter which is the address of the buffer to decrypt (
0x2000):68 00 20 00 00 - Call to the decryption function. The call opcode is
0xE8+ signed displacement starting from the end of the call opcode. The end of our call opcode is at address0x000F, we want to jump to0x0A01, so0x0A01-0x000F=0x09f2. We need to assembleE8 F2 09 00 00.
You can use Malcat's calculator to perform quick computation while analysing a binary, just hit Ctrl+Space. Internally, it uses the python interpreter, so use python syntax.
At the end, the patched shellcode should look like in the picture below. For the lazy readers, you can download the patched lognp file here (password: infected).
Running speakeasy
Now the only thing we have to do is to let speakeasy do its magic:
- let us define the entry point: right-click at address 0 and chose Force function start in the context menu
- run the script
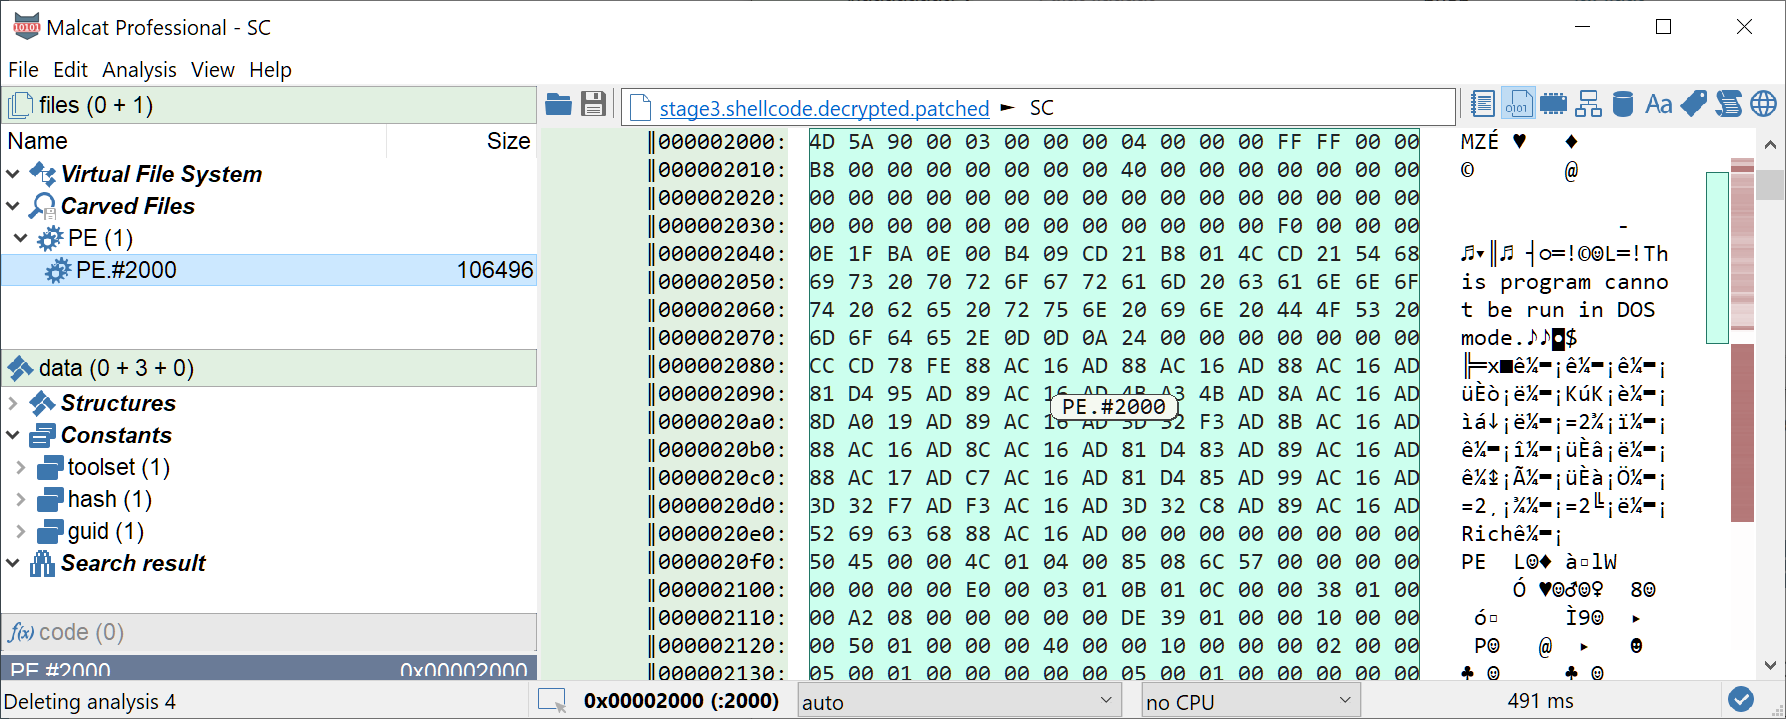
speakeasy_shellcode.py(Ctrl+U to run user scripts)
... and voila, Malcat should open the result in a new file. A PE file has been detected by Malcat's file format parser at address 0x2000, perfect! Just double-click the PE file under "Carved Files" to open it.
Stage 3: Lokibot and config extraction
The last (and final) stage we get is a PE file of sha 02dee91a81652e5234414e452622307fd61e7988e82bec43665f699f805c3151 (VT). Judging by the low entropy and the visible strings, the file does not seem to be obfuscated, good news.
So which kind of malware do we face? Malcat's Yara rules already spotted one of main malware intent: stealing credentials, as we can see in the screenshot below:
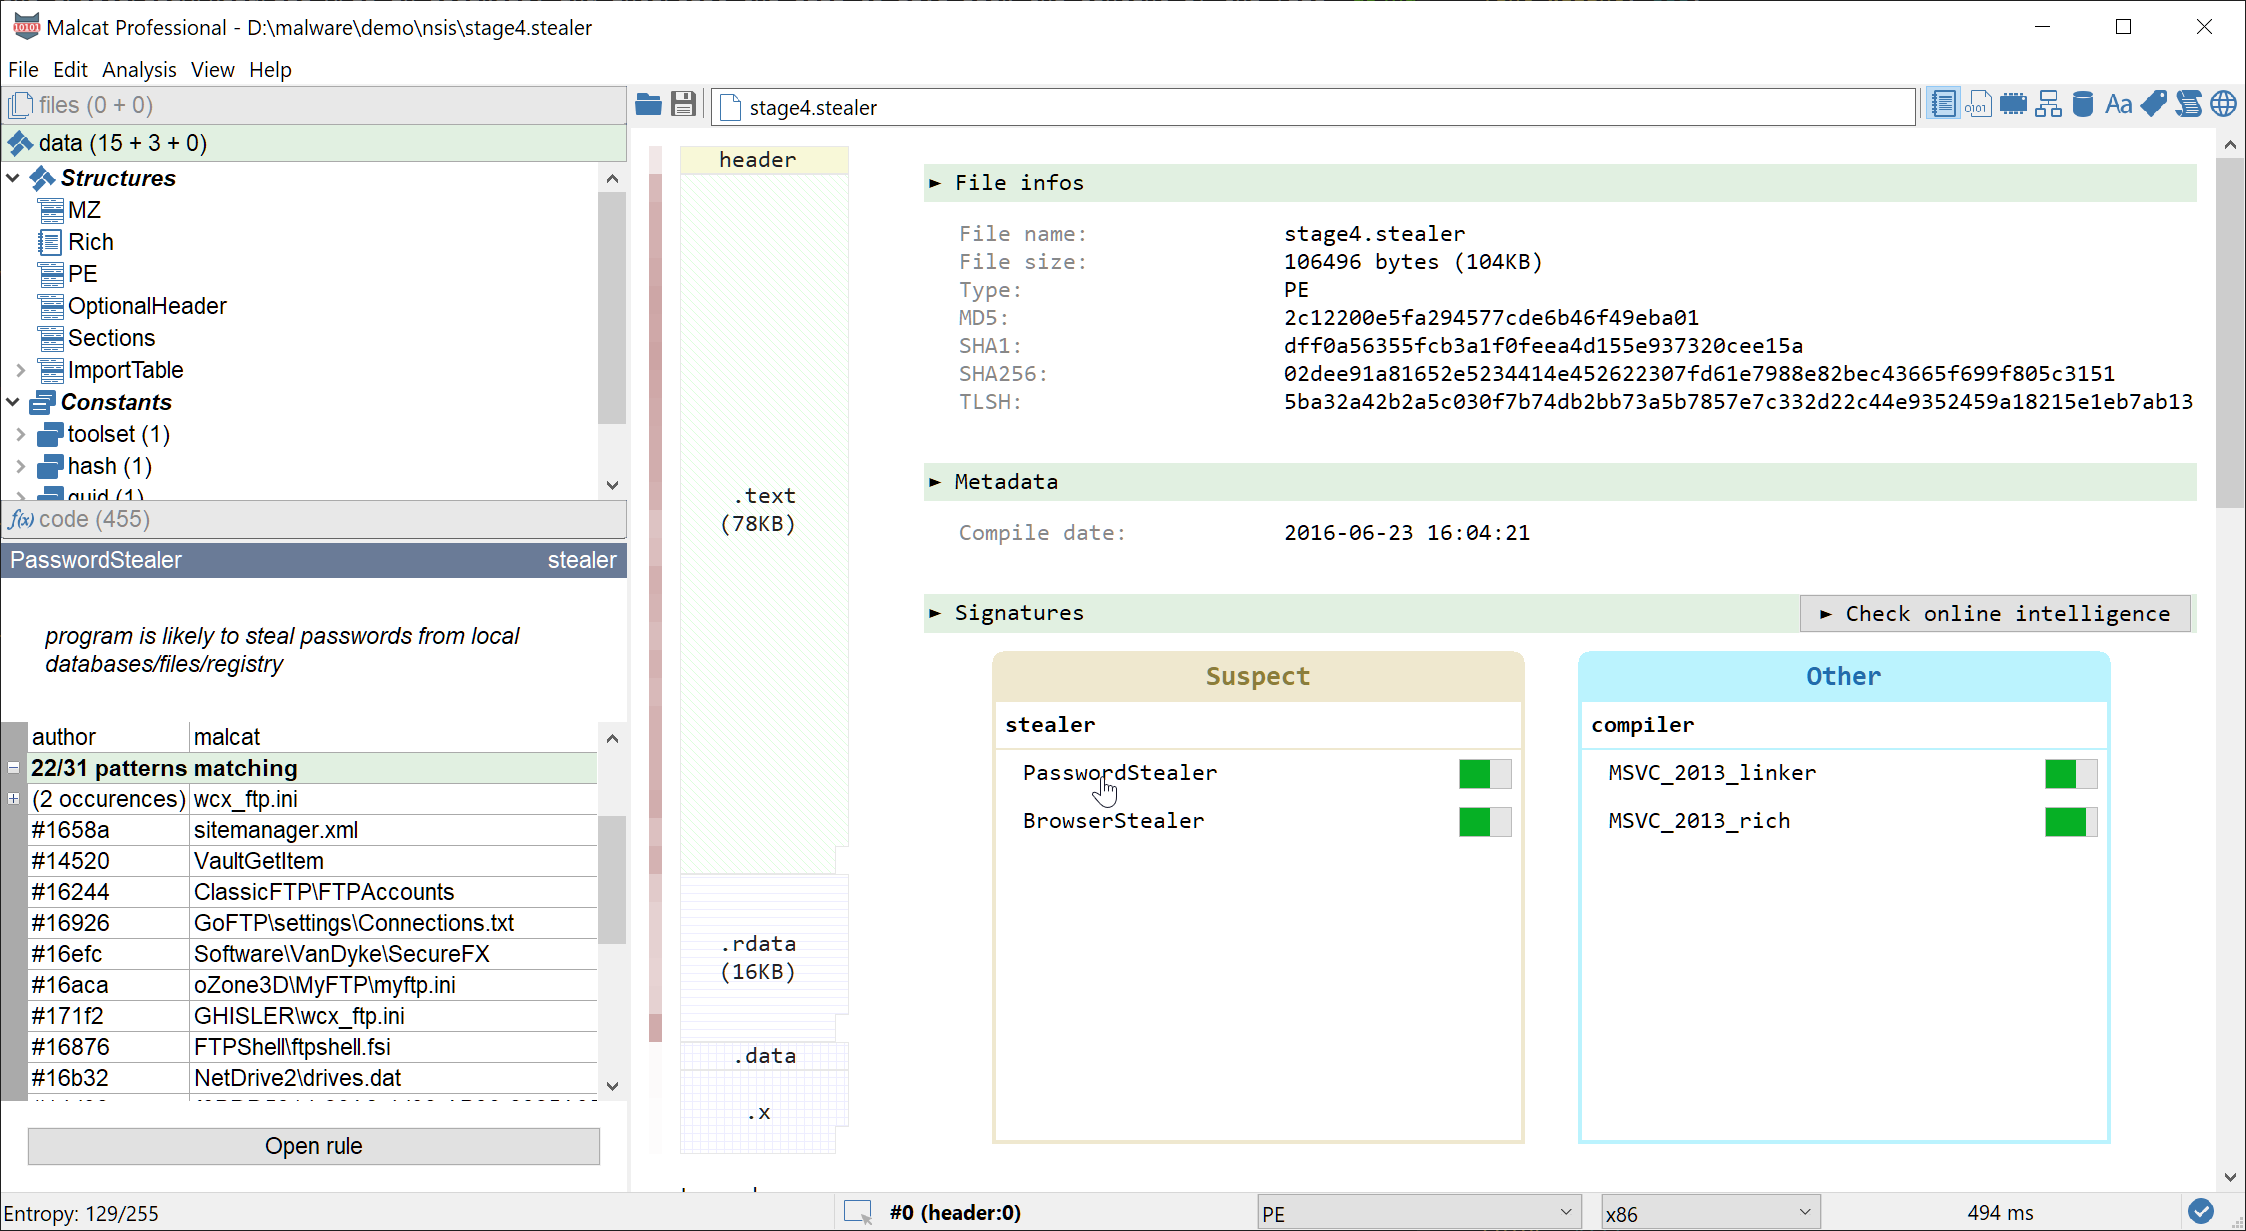
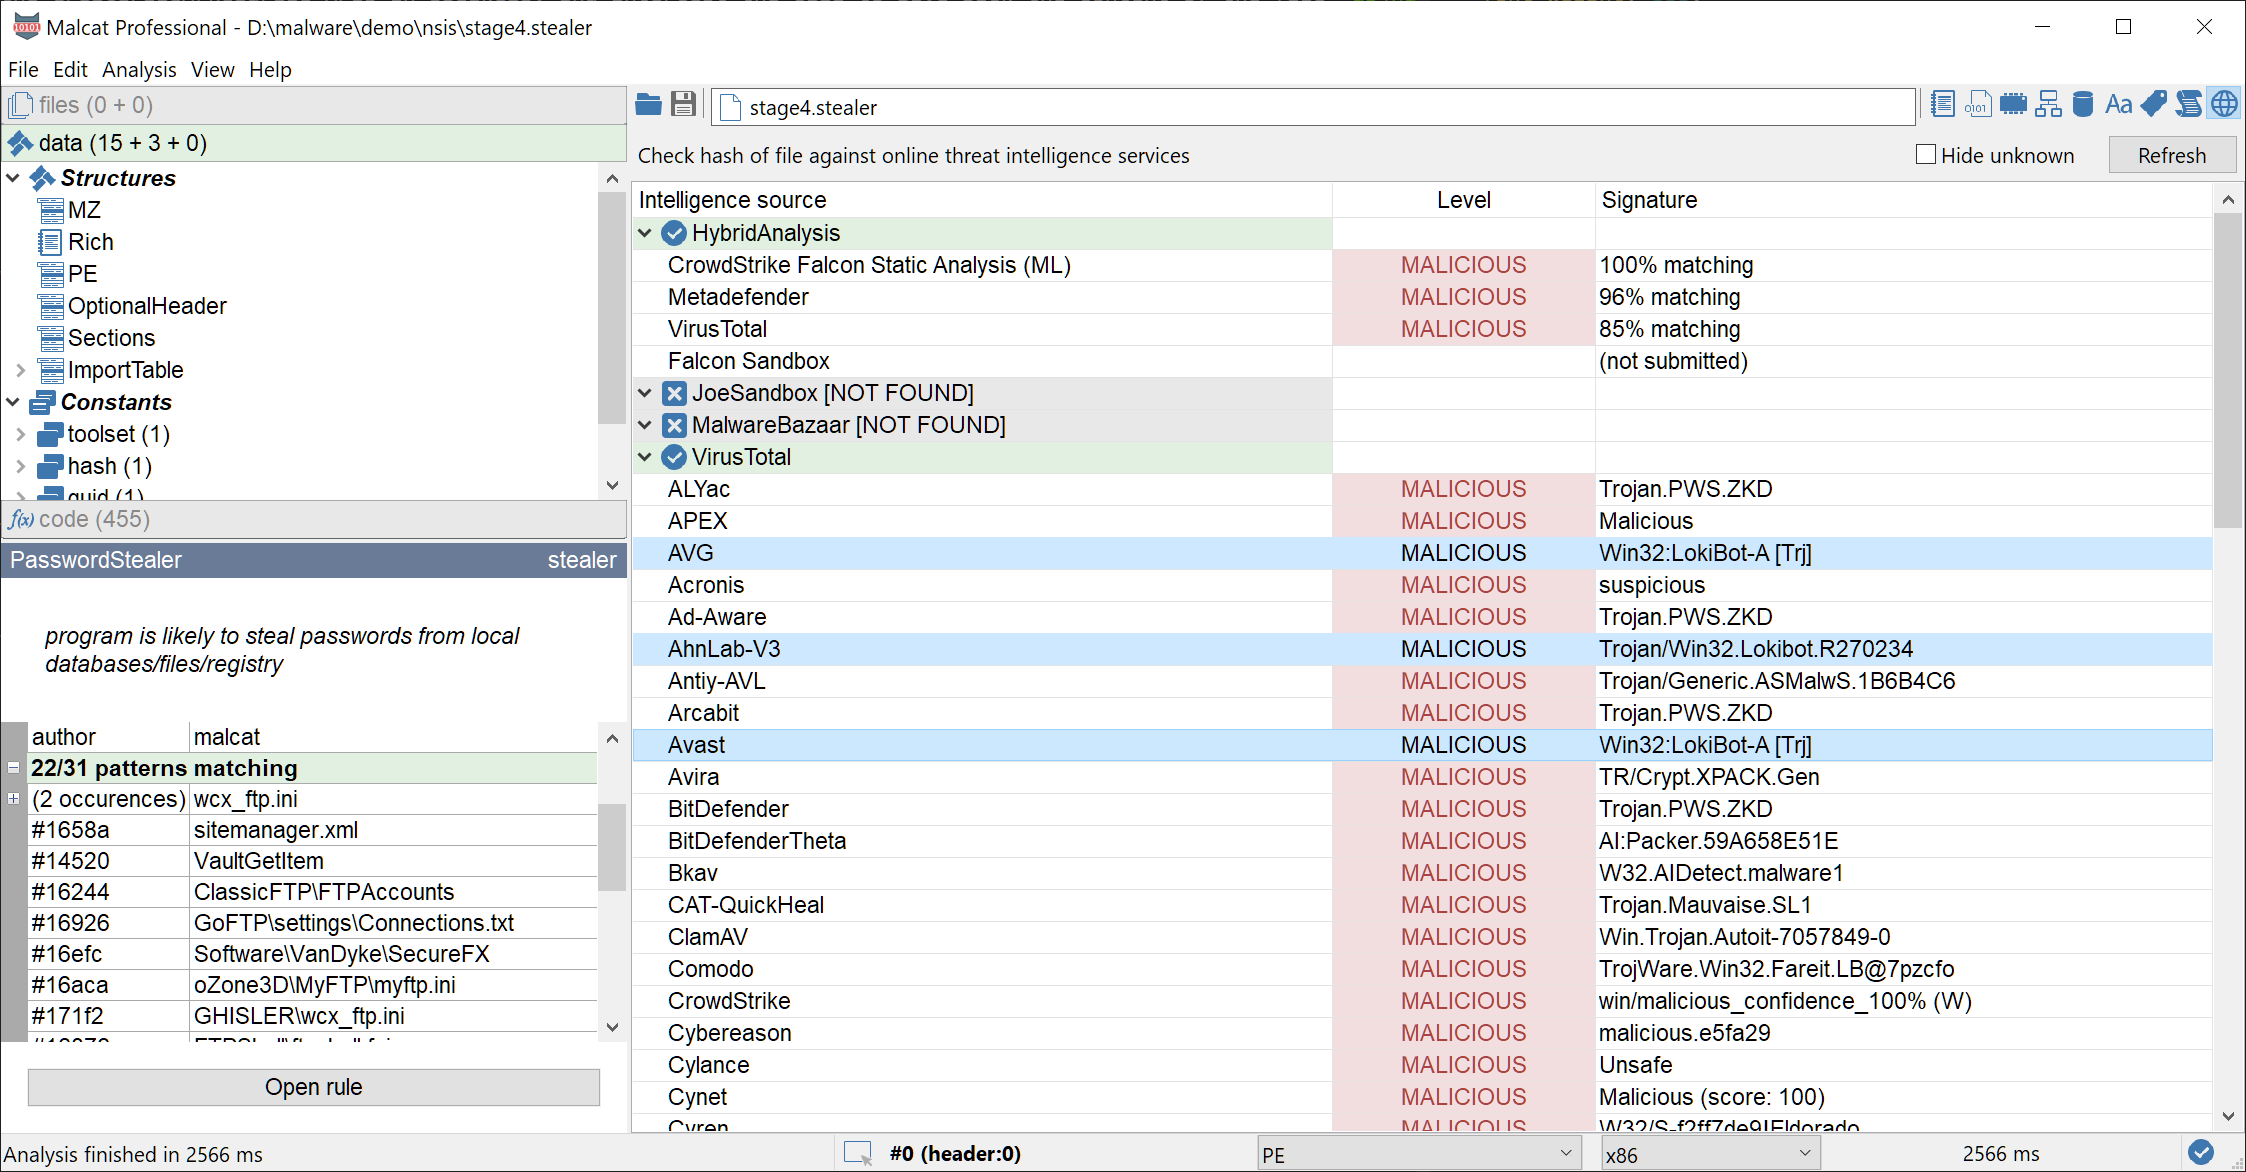
If we want to be more precise, we can use Malcat's online intelligence view (Ctrl+I, only for paid versions). Normally I would avoid using Virustotal to identify a malware family (because of packer reuse among threat actors). But here we are dealing with the plain text final malware, so we should get at least some valid labels. In our case, it seems to be Lokibot, a simple password stealer:
Can we go further? The last section of the PE file is weirdly named ".x". It contains a single method at address 0x4a0000 and a few bytes of referenced data at address 0x4a0074. Looking at the function, it seems to decode the data using a XOR opcode, with the key 0xDDDDFFFF. But actually, only the first byte of the key is used (0xFF), so it is strictly equivalent to performing a simple NOT on the data. Great, let us decrypt these few bytes using Malcat's transform:
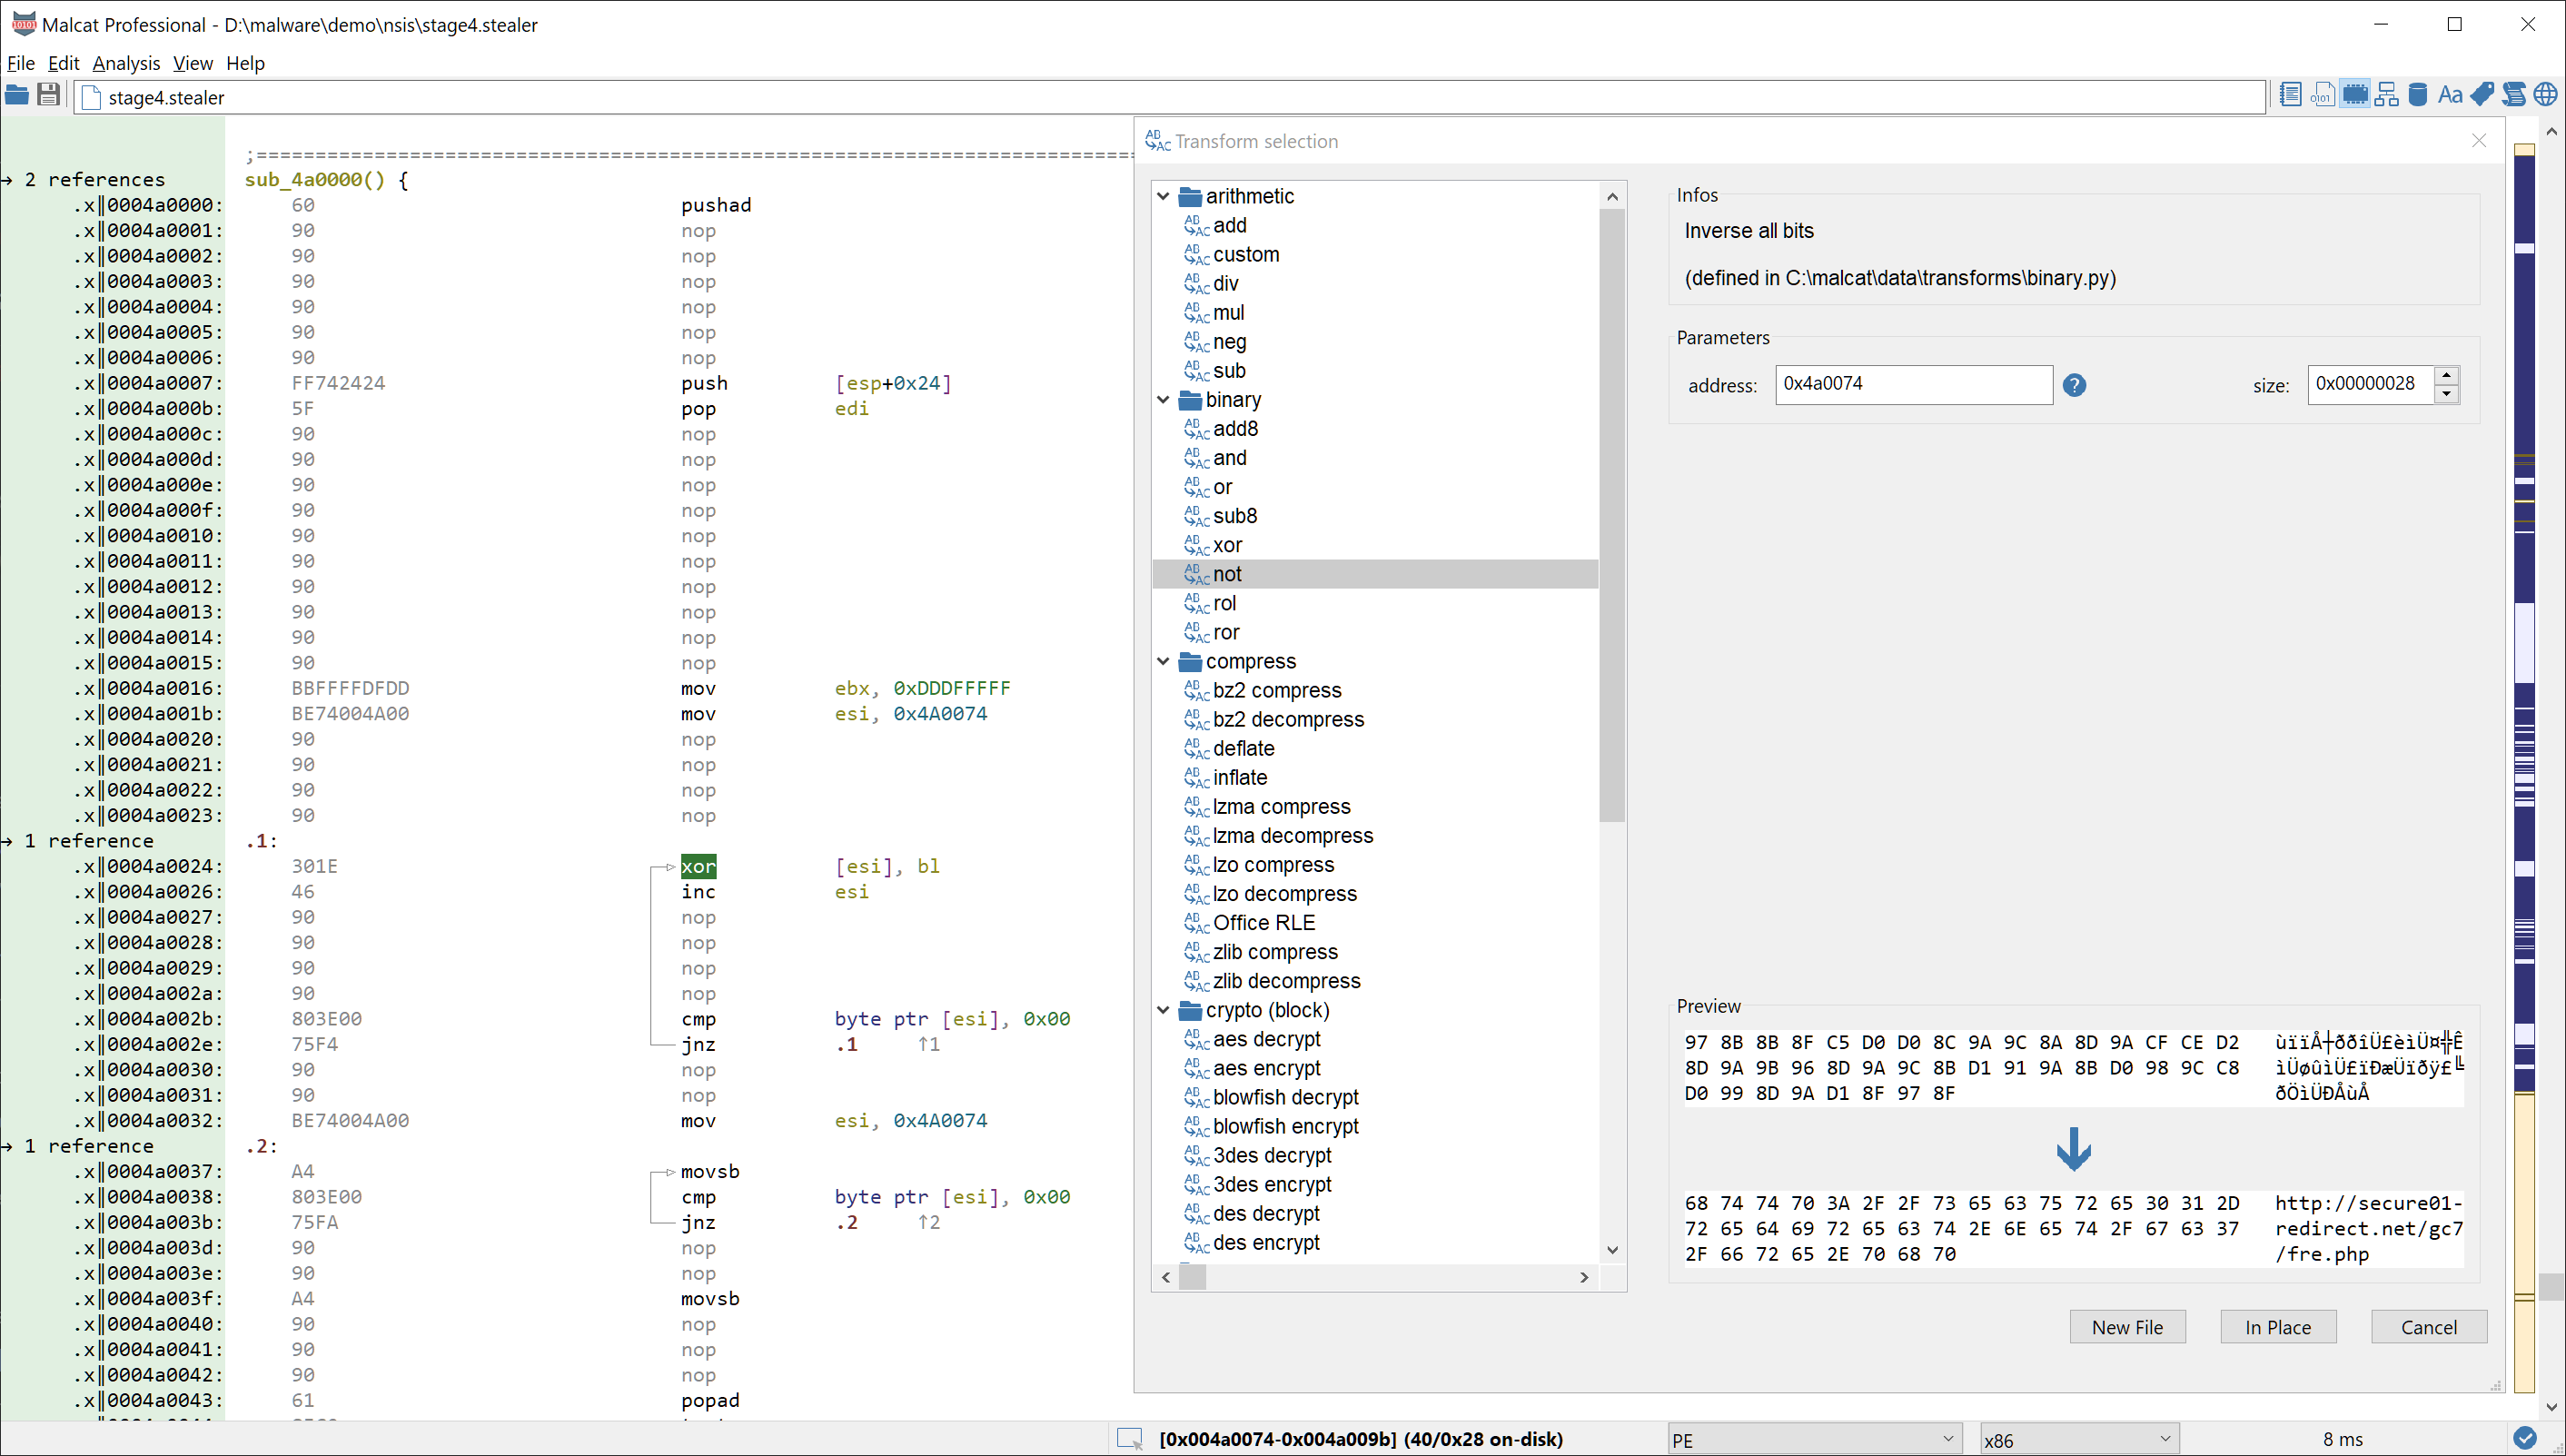
Great, we got the address of the command and control server for this sample. This was a pretty easy catch ^^
Conclusion
NSIS installers have been abused by malware authors for some years now. While the NSIS VM instruction set is relatively limited, DLL plugins allow malicious actors to extend installer capabilities and obfuscate malware. In this example, two layers of shellcodes were used by the NSIS installer in order to deliver its final payload: a LokiBot password stealer.
Instead of running everything in a VM, we made great use of Malcat's NSIS disassembler, Malcat's transforms and speakeasy emulator in order to quickly unpack these two layers statically.
We hope you enjoyed this new quick-and-dirty malware unpacking sessions. Future blog posts will be more focused toward beginners as we will introduce a few of Malcat's features as in-depth tutorials.